In this tutorial I’ll demonstrate how to use Putty on Microsoft Windows PC and SSH tunnel that I can use as a secure SOCKS proxy on your computer.
What’s you need?
1. PuTTY SSH Client. (Download PuTTY from here.)
2. SSH access to a unix/linux server. (dedicated server, vps or shell account) We recommend use cheap webhosting that support SSH.
Recommend SSH webhosting .
Now Let’s configure it step by step.
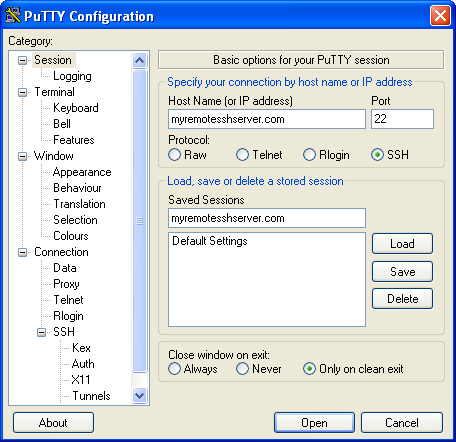
1. Configure Host Name (Or IP Address).Run PuTTY , on the “PuTTY Configuration” window. On the “Host Name (or IP address)” field, type the hostname or IP address of your remote server. This may be the domain name for your network, if you have domain name resolution via a dynamic DNS service or other means set up to allow access to your network via a domain name, or it may be the IP address for your router/firewall.
2.Fill inPort: SSH normally uses port 22, but this may be different, depending on how port forwarding may be set up on your trusted network.
Check screenshot for help:
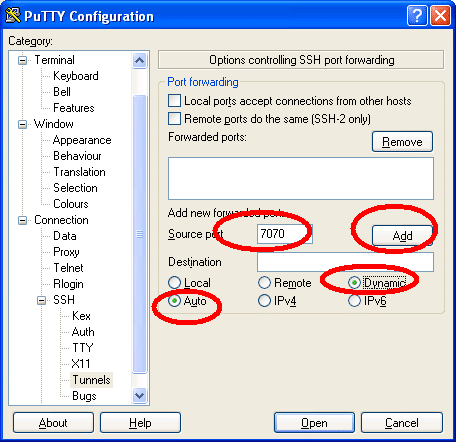
3.Add Source Port: Open the Connection > SSH > Tunnels.Fill in a port number that will be used locally,For instance, you might use port 7070 for forwarded HTTP requests.
4.Select the Dynamic
Check screenshot for help:
5. go back to the “Session” tab at the top of the menu, give the new connection a name and click on the “Save” button.after saving the session settings again to make sure the encrypted tunnel settings will be retrievable, click the Open button to establish the connection. You will have to provide a valid username and password on the remote system to establish the connection.(If you use justhost webhosting the username and password is your cPanel account and password.)
Now on you can use this connection to login to your server. After login, you winn be able to use the connection as SSH Tunnel, you can use it as SOCKS proxy now.
Configure Firefox use this SSH SOCKS proxy:
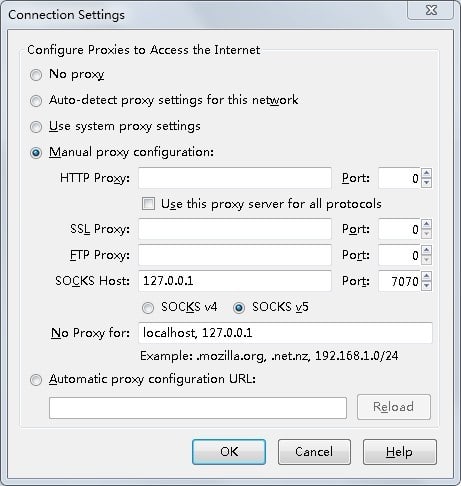
Open the Options > (select) Advanced. Make sure the Network tab is selected, and click the Settings button. Fill in the following data:
- Configure proxies to access the Internet: Select Manual Proxy Configuration.
- SOCKS Host: Enter 127.0.0.1 into the text field.
- Port: For the SOCKS Host, fill in the same port number you specified in the PuTTY tunneling dialog —7070 in the above example.
- Click the OK button to commit the changes.Done!
Check screenshot for help:
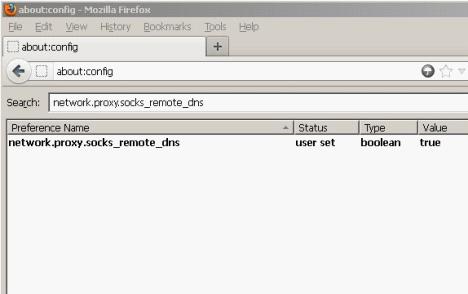
5. open the about:config page, and change network.proxy.socks_remote_dns to true.
Check screenshot for help:That’s all enjoy your private proxies.
From Best anonymous proxy


